How to Install a Garden Water Butt
Installing a plastic watt butt or rain tank is a fairly straightforward procedure which can be undertaken by anyone with basic DIY skills.
The tools normally required are a power drill, hacksaw, tape measure, spirit level. A screwdriver will be needed if you are erecting a wall-mounted butt.
 The steps involved will vary from one butt to another, depending on size and model - so it's essential to carefully read the instruction leaflet or manual that comes with the particular unit you buy.
You should also check that all the parts, screws, brackets and any fittings are there when your butt is delivered to ensure you can install it successfully.
Here are the steps involved to install a standard water butt beside a wall on your house, outbuilding or garage.
- Choose a suitable downpipe from your house and then place your plastic butt or barrel beside it on the ground. The butt should be placed a maximum of 500mm away from the downpipe. Rigid overflow pipes are available to buy if you need to site a butt further away from a downpipe.
- If your butt comes with a base, place the butt on top of it. If you don't have a stand, you will need to buy one or improvise with something robust and sturdy of a similar size and height.
- Make sure the water butt is resting on a solid and flat surface. The surface must be strong enough to bear the weight when your container is filled with water. Remember, the butt will need to be raised high enough above the ground for a watering can to comfortably fit under the attached tap.
- Next, with the butt and stand steadily in place, you will need to drill a hole on the upper outside area of the butt where it faces the downpipe. The hole should be around six to 10 centimetres below the top of the butt and should be drilled using a suitably-sized hole saw or paddle bit. Many butts come with a hole already in place which has a temporary plug in it - this plug will need to be removed to accommodate the diverter feeder hose later in the operation.
- Next you need to use a large spirit level positioned horizontally from the hole on the water butt to the downpipe which should be marked with chalk, pencil or erasable felt tip marker.
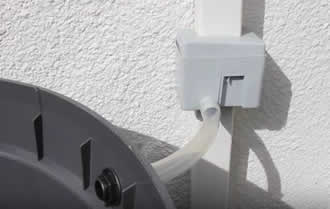
- You now need to cut through the downpipe with a hacksaw, according to the instructions that came with you water butt kit. Most kits will come with a flexible splash seal which should be fitted to the top section of downpipe. The next step is to fit the diverter between the two sections of downpipe, ensuring its position to the outlet pipe is at the bottom and facing the inlet water hole on your butt. Then pull the splash seal over the outer area of the diverter.
- If you experience any difficulty fitting the diverter due to the downpipe being too near the wall, a good tip is to temporarily loosen the screw fastenings which are further up your downpipe.
- Next you need to connect the flexible pipe hose between the butt and diverter. Many kits will have nut on the inside of the butt at the pre-created hole. Remove this nut, push the hose through the hole from inside the butt and then tighten the nut again. Then connect the other end of the hose to the connection point on the diverter.
- Now put the lid on the top of the butt and apply the child-proof lock it if it comes with that feature. Now you just need to wait for it to rain so your butt or barrel can start storing all the water you need for all your gardening tasks.
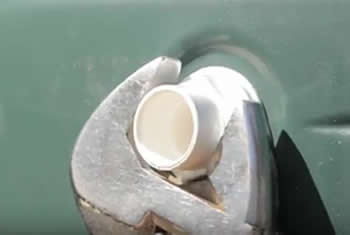
As mentioned previously, this procedure can vary slightly from one brand of water butt to another, but the various stages to fit one are usually quite similar. After a a period of use you may need to tighten the connection points on the butt with an adjustable spanner if they become loose - however, ensure you don't over-tighten or you could damage the threads.
 Similarly, the procedure for fitting a wall-mounted butt can vary depending on the size and make of each product. However, the process basically involved fixing brackets to your exterior wall with screws and rawl plugs, after drilling suitable holes. The butt is then seated evenly onto the brackets.
The height of the brackets should be chosen to allow the base of the water butt to be approximately 50-60cms off the ground. This will allow adequate space to place a bucket below the butt to use the tap on the unit.
You may wish to consider installing a mesh guard over your gutter will help to keep the collected water clean and free of debris such as leaves, bird droppings, pesticides and general muck and dirt.
How to Clean a Water Butt
Cleaning the exterior of a plastic water butt is quite simple - unless you've not attended it for some time and it has become very grubby, with a heavy build-up of dirt and grime.
If this is the case, all that's needed is a bit of elbow grease to remove stubborn stains and then a blast with a garden hose, or better still, a jet hose.
It makes sense to give the exterior of a butt or rain barrel a quick wipe over on a regular basis to stop grime building up in the first place.
Some people clean the exterior of their water barrels with Jeyes fluid, while others opt for a more environmentally-friendly cleaning liquid. It's also important to clean the container lid thoroughly and to ensure that it maintains a good, tight fit.
Here's a few popular products at Amazon for cleaning a water butt.
SHARE THIS PAGE!